Adding Print Server Printers
Adding Print Server printers involves three distinct steps: creating the Print Server object and discovering its printers, assigning those printers to users or groups, and configuring printer-specific settings. You'll complete this process for each print server where you've installed the Print Server service. This reference details each step, the configuration options available, and the assignment modes that control how printers appear to users.
Overview
The printer addition workflow starts with creating a Print Server object in ScrewDrivers Administration. When you create this object, you'll specify the print server's hostname or IP address, and optionally query the server to automatically discover all installed printers. The system imports printer information into the ScrewDrivers database, making those printers available for assignment.
After discovery, you'll assign printers to owners (users, groups, or organizational units). This assignment step determines which users have access to which printers. You can assign printers in three modes—Admin Assigned (forced, users can't remove), User Assigned (shown by default but removable), or User Allowed (hidden by default but users can add).
Finally, you'll configure printer-specific settings like bandwidth control, advanced printing features, and Cloud Connector parameters if your architecture requires them. These settings control how printers behave and how print jobs flow through your infrastructure.
Creating Print Server Objects
Before you begin, ensure you've completed any required environment setup. If you need failover servers or Cloud Connector, configure those first—you can't easily retrofit them after printers are in production use.
Initial Setup
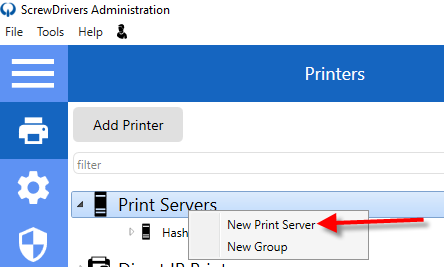
Start by confirming the Objects pane is set to Printer objects. You might need to click the Printers icon on the Administration Icon bar. You can expand the Print Servers folder to see existing print server objects, or use the search function if you have many servers already configured.
Right-click the Print Servers folder and select New Print Server. The New Print Server dialog opens, prompting you for basic information about the server.
Print Server Properties
You'll need to provide three essential pieces of information in the New Print Server dialog:
| Property | Description |
|---|---|
| Name | The display name for this Print Server object in the console. Tricerat recommends using the print server's hostname for consistency and easy identification. |
| Hostname or IP | The fully qualified domain name or IP address that session hosts will use to reach this print server. This must be resolvable from your session hosts. |
| Port | The port the Print Server service listens on. Default is 5550. Only change this if you have a port conflict or your security team requires a non-standard port. |
| Query print server for printers | Enabled by default. When checked, ScrewDrivers immediately connects to the print server and retrieves the complete list of installed printers. Uncheck this only if you want to add printers manually later. |
After entering these values, click Add. The dialog closes and your new Print Server object appears in the Print Servers folder.
Configuring the Print Server Object
Select your newly added Print Server object in the Objects pane. The Information pane displays the Print Server object form with seven tabs containing various configuration options. You'll use the scroll bar on the right side of the Information pane to access all tabs.
General Tab Settings
The General tab contains the core configuration settings you'll use most frequently:
Print Server Properties Section:
These properties mirror what you entered in the New Print Server dialog, but you can edit them here if needed. The Connection ID field shows a unique system-generated identifier for this print server connection—you can't edit this, but it's useful for troubleshooting.
Two important buttons appear in this section:
- Test Connection: Verifies communication with the print server. Always test after adding or modifying a Print Server object. If the test fails, you'll get a detailed error message indicating the problem—typically hostname resolution issues, firewall blocking, or the Print Server service not running.
- Update Printers: Opens the Update Printers dialog, which lets you import printers from the print server into the ScrewDrivers database. You'll use this both during initial setup and later when new printers are added to the print server.
Options Section:
| Option | Description |
|---|---|
| Use Database Cached Printer Information | When enabled, user printers are built using information cached in the ScrewDrivers database rather than querying the print server at login. This improves login performance but means you must manually refresh printer information after making changes to print drivers or printer properties on the print server. |
| Impersonate User When Printing | Enabled by default and recommended to remain on. When a print job reaches the print spooler, it appears as originating from the user rather than from the system account. This matters for audit trails and print accounting systems. |
Tricerat Advanced Print Features Section:
This section controls access to advanced printing capabilities for printers on this print server. See the Advanced Print Features section below for details on what these features provide and when you'd enable or disable them.
Bandwidth Control Tab
If you have limited bandwidth between session hosts and print servers (common in remote office scenarios or WAN connections), use the Bandwidth Control tab to throttle print job transmission:
| Setting | Description |
|---|---|
| Limit bandwidth for print server | Enable this checkbox to activate bandwidth limiting for this print server. |
| Bandwidth rate (KB/per second) | Specify the maximum kilobytes per second allowed for print job transmission to this server. Consider your available bandwidth and number of concurrent users when setting this value. |
Bandwidth limiting helps prevent large print jobs from saturating your network connection and affecting other applications. However, it increases print job completion time, so balance performance against network impact.
Cloud Connector Tab
If you're using ScrewDrivers Cloud Connector (covered in Cloud Connector Setup), configure these settings:
| Setting | Description |
|---|---|
| Internal Connector Address | The hostname or IP address of your Internal Connector, including the port (default 5550). This tells the print server where to establish its connection. |
| Connector Group | The group name configured in your Cloud Connector deployment. This organizes multiple print servers that share the same connector infrastructure. |
| Connector Username | Authentication credentials for connecting to the Internal Connector. These must match what you configured in the ScrewDrivers Connector application during Remote Mode setup. |
These values must exactly match your Cloud Connector configuration. Mismatches prevent the print server from connecting properly.
Information Tab
The Information tab displays read-only details about the print server including OS Platform ID, OS Major Version, and service version information. You can click Refresh Server Information at the bottom of this tab to update these details in real-time. This is useful for verifying print server software versions during troubleshooting.
Discovering and Importing Printers
After configuring the Print Server object, click Save to commit your changes. Then click Test Connection on the General tab to verify communication. You should see a success message indicating the connection is working.

Once the connection test succeeds, click Update Printers. The Update Printers dialog opens, showing all printers currently installed on the print server that haven't been imported to the ScrewDrivers database yet.
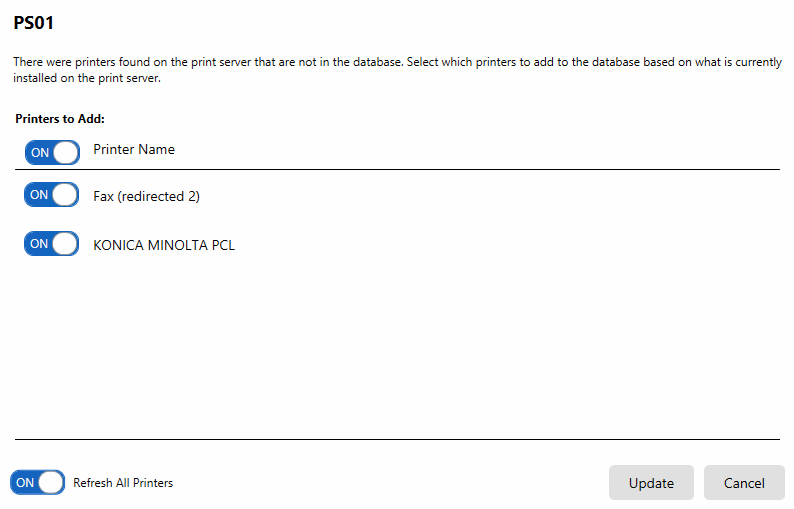
By default, all discovered printers are selected for import. You can uncheck any printers you don't want to make available through ScrewDrivers. Common printers to exclude include fax machines, Microsoft XPS Document Writer, or administrative-only printers.
Click Update to begin the import process. A series of progress messages appear as printer data is gathered and added to the database. This process can take several minutes depending on the number of printers. ScrewDrivers Administration becomes unavailable during this time—you'll need to wait for the update to complete before continuing.
When the update finishes, each imported printer appears as a separate entry in the Objects pane under your Print Server object. These printers are now ready for assignment to users.
Assigning Printers to Owners
After importing printers, you'll assign them to owners to control which users have access to which printers. ScrewDrivers supports three assignment modes that provide different levels of user control over printer visibility.
Assignment Modes
Understanding the three assignment modes is crucial for providing the right balance between administrative control and user flexibility:
Admin Assigned (Always show this printer):
Printers assigned in this mode always appear for the owner—users can't remove them. Use this mode for critical printers that users must have available, like department printers or required label printers in healthcare or retail environments. Users can set an Admin Assigned printer as their default printer, but they can't delete it from their session.
User Assigned (Show this printer by default, but allow users to remove it):
Printers in this mode appear automatically but users can remove them through the ScrewDrivers Printers application. This mode works well for commonly used printers that most users need, but where some users might want to declutter their printer list. Users can delete and re-add these printers as needed.
User Allowed (Don't show this printer by default, but allow users to add it):
Printers in this mode don't appear automatically—users must explicitly add them through the ScrewDrivers Printers application. Once added, users can remove them, but they can't add them back. This mode suits specialty printers that only some users need occasionally, like large-format plotters or color proof printers.
Direct Assignment Procedure
To directly assign a print server printer to an owner, select the printer in the Objects pane and drag it to the appropriate owner in the Assignments pane. If you need an owner that doesn't exist in your Active Directory structure, you can create custom Network owners—see Managing Owners for procedures.
When you drop the printer on an owner, a dialog appears asking how the printer should behave:

Select the appropriate mode and click OK. The printer is now assigned to that owner with the specified behavior. The assigned printer appears beneath the owner entry in the Assignments pane with its assignment mode displayed.
You can assign the same printer to multiple owners with different modes. For example, you might assign a color printer as Admin Assigned to the marketing department (they need it always available) and User Allowed to finance (they rarely use it).
Configuring Assigned Printers
After assignment, you'll configure printer-specific settings that control how each printer behaves for its assigned owners. These settings appear on the printer object's configuration form.
Advanced Print Features
Advanced Print Features (APF) provide access to printer-specific capabilities like stapling, hole punching, booklet printing, and duplex options. Whether you enable APF depends on your printer hardware capabilities and user needs.
You can enable or disable APF at three levels:
- Print Server level: Affects all printers on a specific print server
- Individual printer level: Affects only one printer regardless of print server
- Session settings level: Affects how session hosts handle APF for all printers
To enable/disable APF for a specific printer, select the printer in the Objects pane. On the printer's configuration form, look for the Advanced Print Features setting. You can set this to Enabled (turn on APF for this printer), Disabled (turn off APF), or Inherit (use the print server's setting).
When APF is enabled, users see a second print dialog with hardware-specific options when printing. This dialog appears on the client side after the standard application print dialog, letting users select finishing options before the job spools.
Location-Based Assignment
For dynamic printer assignment based on user location, you'll configure printer assignments using Maps. Maps let you define printer availability based on client hostname, IP address, or IP address ranges. When users log in from different locations, they automatically get appropriate printers without manual reconfiguration.
Setting up location-based assignment requires configuring Maps objects and associating them with printers and owners. See Maps Reference for detailed configuration procedures.
Related Resources
- How-To Guide: Refreshing Print Server Printers - Updating printer lists
- Reference: Print Server Overview - General Print Server concepts
- Reference: Updating Print Server Printers - Maintenance procedures
- Reference: Managing Assignments - Assignment operations
- Reference: Maps Reference - Location-based printer assignment