Print Server Failover
Print Server failover ensures continuous printing availability even when your primary print server becomes unreachable. You'll configure failover when printing is business-critical and downtime would disrupt operations—think healthcare facilities printing prescription labels, retail locations processing shipping labels, or financial institutions printing compliance documents. This reference details how failover works, how to configure it, and how to manage your failover server list.
Overview
ScrewDrivers Print Server failover provides true high-availability printing, not load balancing. Your failover servers remain idle until the primary server fails, then automatically take over print processing. This architecture requires you to maintain multiple identical print servers with matching configurations—same print queues, queue names, drivers, and operating systems.
When you configure failover, you designate one server as primary and assign its printers to users. The other identical servers go into your Failover Print Servers list. If ScrewDrivers can't communicate with any printer on the primary server, it queries your failover servers in the order they appear in the list. The system tries each failover server until either a job completes successfully or the list is exhausted. If all servers fail, the print job fails.
For example, if you have PS01 as primary with failover servers PS02, PS03, and PS04, a communication failure with PS01 triggers sequential queries to PS02, PS03, and then PS04 until one succeeds. The order matters—servers higher in the list get tried first, so you'll typically list your most reliable or geographically closest servers first.
Failover Configuration Requirements
Before configuring failover, you'll need to ensure your print server infrastructure meets specific requirements. All servers in a failover group must be truly identical—this isn't just best practice, it's a technical requirement for seamless failover.
Server Identity Requirements
Each print server in your failover group must have exactly matching configurations. This means identical print queue names (not just similar—character-for-character identical), the same printer drivers with the same versions, and the same operating system. Even minor differences like Windows Server 2019 versus Windows Server 2022, or driver version 10.1 versus 10.2, can cause failover problems because printer properties and capabilities might differ.
The physical printers themselves don't need to be identical across locations—you can have a Canon printer in New York and a Xerox in London as long as both use queues configured identically on their respective print servers. What matters is configuration consistency on the server side, not printer hardware consistency.
Network and Connectivity Requirements
Your session hosts must be able to reach all failover servers via network connectivity. If you have firewalls between session hosts and print servers, ensure all Print Server service ports are open to all servers in the failover group. Partial connectivity where session hosts can reach the primary but not failovers defeats the purpose of the configuration.
Adding Failover Print Servers
You'll add failover servers after configuring your primary Print Server but before users depend on it for production work. The configuration happens in the Print Server object's Failover Print Servers tab.
Configuration Procedure
First, you'll need to have already added, assigned, and configured your primary print server printers for users. The failover servers must already exist with their matching printer configurations in place—you're not creating new printers, you're telling ScrewDrivers where to fail over to.
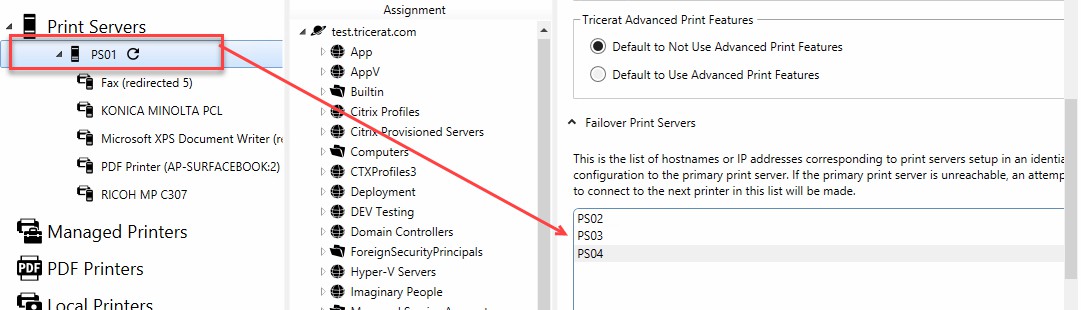
In the Objects pane of ScrewDrivers Administration, select your primary Print Server object. The Information pane displays the Print Server object form. Open the Failover Print Servers tab, which initially shows an empty list.
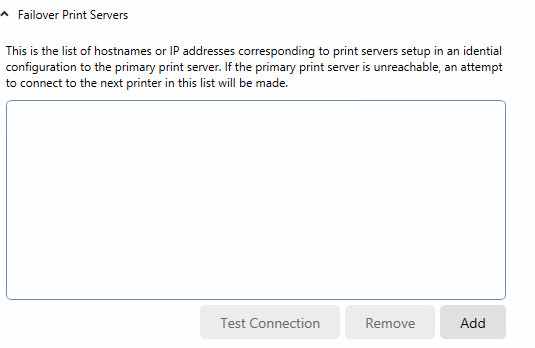
For each failover server you want to add, click the Add button. The system displays a placeholder entry labeled "New Failover Print Server." Click this entry to select it, then type the actual server name. This should be the fully qualified domain name or hostname that your session hosts use to reach the print server.
After adding the server name, you'll want to verify connectivity before saving. With the newly added failover server still selected in the list, click Test Connection. If the connection succeeds, you'll see a confirmation message indicating the print server is reachable and responding correctly.

If you get a connection error instead, you'll need to resolve the issue before proceeding. Common problems include incorrect server names, firewall blocking, or the Print Server service not running on the failover server. Fix whatever's causing the error and test again until you see the success message.
Once the connection test succeeds, click OK to close the message dialog. The failover print server is now configured and will activate automatically if the primary server fails. Repeat this process for each additional failover server you want to add. When you've finished adding all failover servers, click Save to commit the configuration.
Failover Server Priority
The order of servers in your Failover Print Servers list determines the sequence ScrewDrivers uses during failover. The first server in the list gets tried first, the second gets tried if the first fails, and so on. You can reorder servers by dragging them in the list if you need to change priorities after adding them.
Consider geographic proximity, server capacity, and reliability when ordering your failover list. If your users are primarily in New York, list your New York failover server first even if you have servers in London and Sydney. The first server to succeed handles the job, so optimizing this order reduces latency during failover scenarios.
Removing Failover Print Servers
You can remove failover servers when they're no longer needed or if you added one incorrectly. However, removal is immediate and affects any jobs currently routing to that server, so you'll want to be certain before proceeding.
Removal Behavior
When you remove a failover server, it's immediately removed from the failover list. Any print jobs currently in progress to that server will complete, but any jobs still queued when removal happens cannot complete. Those queued jobs will fail unless another failover server in the list can process them.
This immediate removal behavior means you shouldn't remove failover servers during business hours unless absolutely necessary. Plan removals for maintenance windows when print traffic is minimal.
Removal Procedure
Start by confirming the Objects pane is set to Printer objects—you might need to click the Printers icon on the Icon bar. Expand the Print Servers folder to view all available Print Server objects, or use the search function if you have many servers.
Select the primary Print Server object that has the failover server you want to remove. In the Information pane, open the Failover Print Servers tab. You'll see the complete list of configured failover servers.
Select the failover server you want to remove from the list. If you need to remove multiple servers, hold CTRL while clicking to select multiple entries. Once you've selected the server or servers, click Remove.
Important: The system doesn't ask for confirmation—clicking Remove immediately deletes the selected servers from the failover list. Make absolutely certain you've selected the correct servers before clicking Remove. There's no undo function.
After removing the servers, click Save to commit the change. The removed servers are immediately unavailable for failover, though they remain operational as standalone print servers if needed.
Failover Monitoring and Testing
After configuring failover, you'll want to periodically test that it works as expected. The Test Connection button verifies basic connectivity, but it doesn't test actual failover behavior under simulated failure conditions.
To properly test failover, you'll need to simulate a primary server failure by either stopping the Print Server service on the primary or temporarily blocking network access. Submit a test print job during this simulated failure and verify it completes successfully from a failover server. Check the ScrewDrivers logs to confirm which failover server processed the job and how long the failover took.
You should test failover at least quarterly, and always after making infrastructure changes that could affect print server connectivity. This proactive testing catches configuration problems before they affect production printing.
Related Resources
- How-To Guide: Print Server Failover Setup - Step-by-step setup guide
- Explanation: Print Server Architecture - How failover fits into the architecture
- Reference: Print Server Overview - General Print Server concepts
- Reference: Adding Print Server Printers - Primary server configuration