Admin Console Overview
The ScrewDrivers Administration console is your central management interface for all ScrewDrivers Pro and Enterprise deployments. Whether you're assigning printers to users, configuring session settings, or troubleshooting print infrastructure, you'll spend most of your time in this application. Understanding its layout and core concepts will help you work efficiently and manage your printing environment effectively.
Core Concepts
Before diving into the console interface, it's essential to understand the three primary entities you'll work with in ScrewDrivers Administration: objects, owners, and assignments. These fundamental concepts form the foundation of how ScrewDrivers manages print and scan infrastructure.
Objects represent the resources you're managing—printers, scanners, printer profiles, and maps. You'll create objects in the console and organize them into groups for easier management.
Owners are the users, groups, computers, or organizational units that receive objects in their sessions. ScrewDrivers synchronizes with Active Directory to populate owners, and you can manage them hierarchically to reflect your organizational structure.
Assignments create the relationship between objects and owners. When you assign a printer object to a user owner, that printer becomes available in the user's session. Understanding how owner inheritance and multiple assignment resolution work is crucial for predictable printer deployment.
Starting ScrewDrivers Administration
ScrewDrivers Administration is typically installed alongside your ScrewDrivers products on Windows servers or workstations. You'll need at least one instance of the administration console installed to configure any ScrewDrivers components. The good news is that the console itself is unlicensed, so you can install it on as many administrator workstations as needed.
Many ScrewDrivers administrators install the console on their workstations to provide remote management capabilities. You can configure assignments and change settings from anywhere with database connectivity, which is especially valuable for managing distributed deployments.
After installation, you'll find a desktop shortcut and Start menu entry. To launch the console:
- Double-click the desktop icon, or
- Navigate to Start > All Programs > Tricerat > ScrewDrivers Administration
![]()
The console opens in a single main window where you'll carry out all entity management tasks.
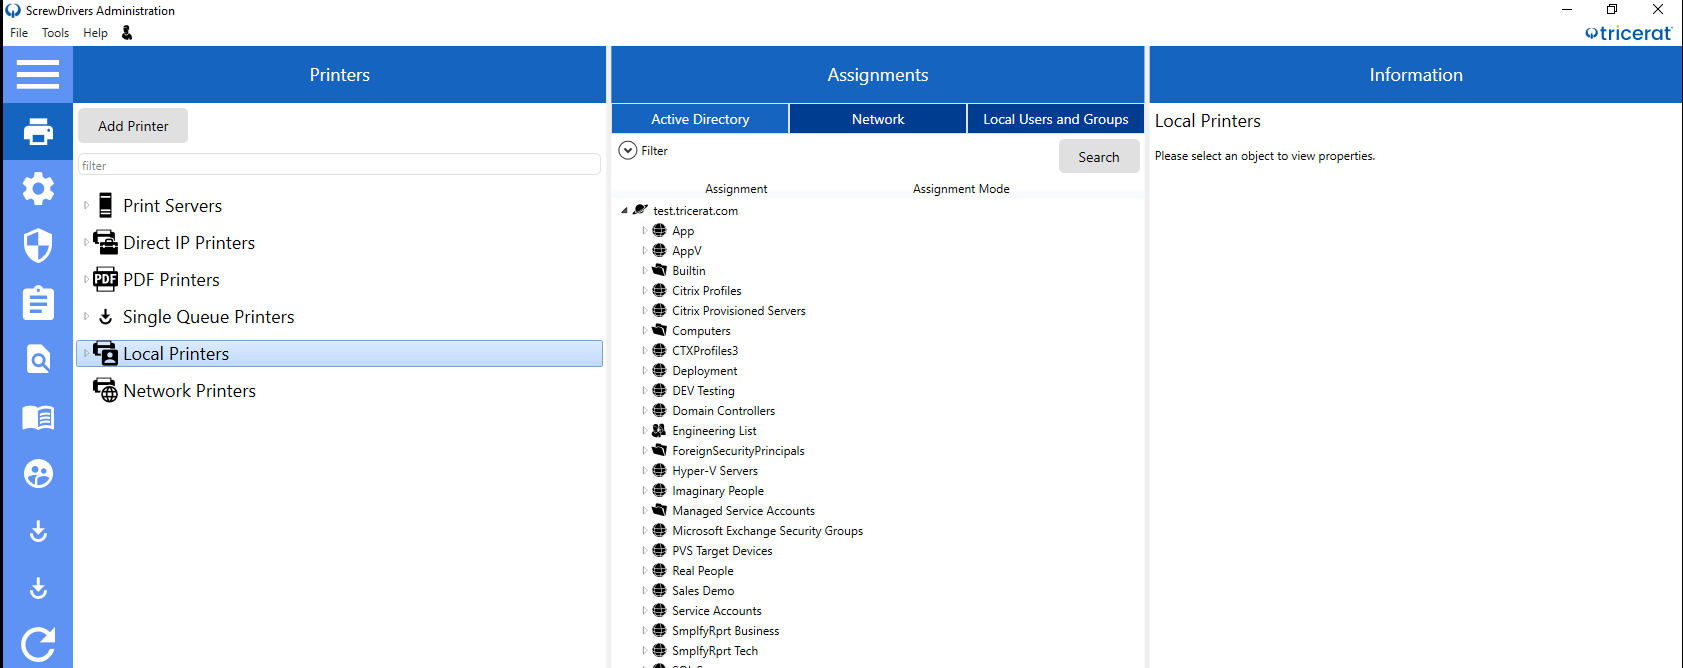
Console Layout
The ScrewDrivers Administration interface uses a three-pane layout that provides different perspectives on your managed entities. At the top, you'll find a main menu bar and icon toolbar for quick access to common operations. The three panes below organize your work into logical views.
Main Menu Bar
The main menu follows standard Windows conventions, with commands grouped into File, Tools, and Help menus. You'll use these menus to access global settings, launch supporting applications, and get help when needed.
The File menu provides access to the Options dialog box (where you configure console behavior, database settings, and auditing) and the Exit command. The Tools menu links to supporting applications like Database Connection, Maps, Logging, and Licensing—all of which are also available from the Start menu. The Help menu connects you to Tricerat's support resources and displays version information about your installation.
A User icon appears in the menu bar showing information about your current session, including your Active Directory username, user classification (like Super Admin), domain, and workstation name.

Icon Toolbar
Below the main menu, an icon toolbar provides single-click access to frequently used operations. You'll find yourself using these icons constantly for creating objects, managing assignments, and navigating the console. We'll cover the specific icons and their functions in the Icon Bar Reference.
Console Panes
The three panes form the heart of your workflow. The Objects pane on the left displays a hierarchical view of all managed objects—printers, scanners, profiles, and groups. You'll browse and select objects here to view their properties or create assignments.
The Assignments pane in the middle shows the relationship between objects and owners. When you select an object in the Objects pane, you'll see which owners are assigned to it. Conversely, you can view all objects assigned to a particular owner. This bidirectional view makes it easy to understand and verify your deployment.
The Information pane on the right displays detailed properties for whatever you've selected. When you click an object, you'll see its configuration, session settings, and metadata. When you select an owner, you'll see their assignments and inheritance chain. This context-sensitive panel provides all the details you need without opening separate dialog boxes.
Each pane is resizable, so you can adjust the layout to match your workflow. Most administrators expand the pane they're currently working in and collapse the others for better visibility.
Options Dialog Box
The Options dialog box (File > Options) controls global settings that affect ScrewDrivers Administration, database behavior, and auditing. Understanding these settings helps you optimize console performance and maintain compliance.
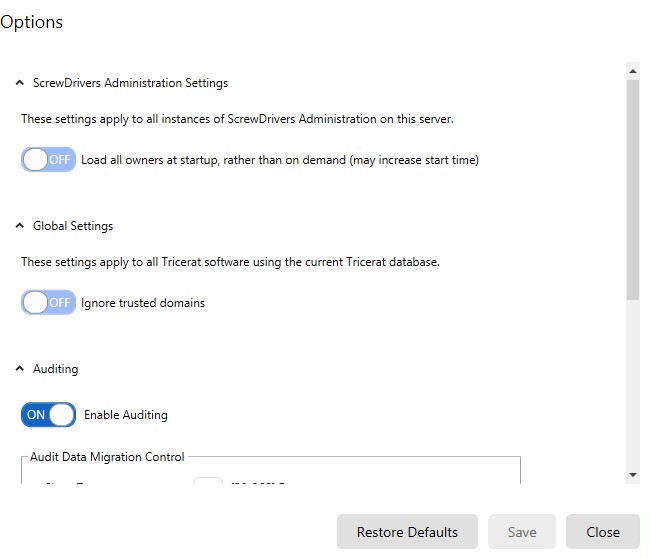
Administration Settings
Load all owners at startup determines whether the console loads the complete owner list when it launches or loads owners on demand as you navigate. By default, this is turned off, which makes startup faster. If you turn it on, you'll see all owners immediately, but the console may take longer to open—especially in large environments with thousands of users. This setting applies to all instances of the administration console on the current server.
Global Settings
Ignore trusted domains controls whether ScrewDrivers considers domain trust relationships when resolving owners. By default, this is off, meaning ScrewDrivers respects Active Directory trust relationships. If you turn this on, the setting applies to all Tricerat products using your ScrewDrivers database.
Auditing Configuration
Enable Auditing (on by default) activates the audit logging system. ScrewDrivers maintains two audit tables for each database table—one for short-term audit data and one for long-term historical records. This dual-table approach balances query performance with compliance requirements.
Short Term specifies how many days to retain data in the short-term audit tables before automatic migration. The default is 30 days, which works well for most organizations. If you need longer retention for recent audits, increase this value.
Daily Migration Hour sets when the automatic migration process moves data from short-term to long-term audit tables. You'll typically set this to a time when your database isn't busy with other operations—perhaps 2 AM or another off-peak hour.
The Audit Data Migration Status panel shows whether a migration is currently running and displays the timestamp of the last successful migration.
You can manually trigger a migration by clicking Migrate. This is useful when you're setting up auditing for the first time or troubleshooting audit data issues.
If you make changes in the Options dialog box, you must click Save to apply them. To reset all settings to their defaults in one operation, click Restore Defaults—though note that this resets everything at once, not individual settings.
Related Resources
- How-To Guide: Installation and Setup Guides - Installation procedures and configuration guides
- Explanation: Architecture Overview for understanding how the administration console fits into the overall ScrewDrivers architecture
- Next Steps: Continue to Main Menu Reference for detailed menu command documentation