Upgrading to ScrewDrivers v7 Essentials Edition
Overview
This guide walks you through upgrading from ScrewDrivers v6 (or Simplify Printing v6) to ScrewDrivers v7. This guide covers both Essentials edition and Pro/Enterprise editions. The Essentials edition is designed for small to medium-sized deployments and provides streamlined print and scan management without requiring SQL Server infrastructure. Pro and Enterprise editions include SQL database, Administration console, and Print Server components for centralized management.
The upgrade process involves:
- Preparing your environment with prerequisites
- Upgrading licensing infrastructure (Pro/Enterprise)
- Upgrading your App Servers/VDI hosts or Print Servers
- Configuring Auto Client Update settings (v7 feature)
- Migrating client workstations from v6 to v7
In v7, "Essentials" is the product name for what was called "ScrewDrivers" or "Simplify Printing" in v6. The file naming convention reflects this:
- ScrewDriversEssentials_7.x.x.xxxxx_x64.msi (Essentials edition - session-side)
- ScrewDriversProOrEnterprise_7.x.x.xxxxx_x64.exe (Pro and Enterprise editions)
- ScrewDriversClient_7.x.x.xxxxx_x64.msi (client-side for all editions)
This guide references ScrewDrivers v7.9.4 as the current release. Always download the latest version from Tricerat's Box.com Downloads for the most recent bug fixes and features.
Pre-Upgrade Checklist
Before beginning the upgrade, complete these essential preparation steps.
1. Document Current Configuration
Before uninstalling v6, document your current settings so you can replicate them in v7:
Server Settings to Document:
- Printer Naming convention (how printers are named when created in sessions)
- Printer Creation settings (auto-create, manual, profile-based)
- Licensing configuration (license server address or nodelock key)
- Custom settings or policies you've configured
Client Settings to Document:
- Client-side configuration options (if any custom settings were deployed)
- Any printer filters or exclusions
- Custom registry settings or policies
Take screenshots of the v6 configuration screens or export settings if available. This ensures accurate replication in v7.
2. Install .NET Framework 4.8
ScrewDrivers v7 requires .NET Framework 4.8 on all systems that will run v7 software.
Installation:
- .NET 4.8 installer is provided with the ScrewDrivers v7 installers
- Install on all App Servers/VDI hosts
- Install on any systems that will run the v7 client (if applicable)
Verify Installation:
# Check if .NET 4.8 is installed
Get-ChildItem 'HKLM:\SOFTWARE\Microsoft\NET Framework Setup\NDP\v4\Full\' |
Get-ItemPropertyValue -Name Release |
ForEach-Object { $_ -ge 528040 }
# Returns True if .NET 4.8 or higher is installed
3. Upgrade and Activate License
Upgrade License Server:
- Upgrade your Tricerat License Server to the latest version
- License Server upgrade is included in the downloads package
- Verify the License Server is running and accessible
Activate v7 License Key:
- Obtain your v7 license key from Tricerat
- Activate the v7 key on your License Server
- If using nodelock licensing, obtain and prepare your v7 nodelock key
v6 and v7 licenses are separate. You must activate a v7 license before beginning the upgrade. Contact Tricerat sales if you need to obtain v7 licensing.
4. Plan Downtime
Schedule the upgrade during a maintenance window:
- Users will lose access to printers during the server upgrade
- Plan for 30-60 minutes per server for uninstall, install, and configuration
- Client upgrades can typically be rolled out gradually (v6 clients work with v7 servers temporarily)
Upgrading App Servers/VDI Hosts
The App Server (also called Session Host or VDI host) is where users connect and where printers are created in their sessions.
Step 1: Uninstall ScrewDrivers v6
- Open Programs and Features (or Add/Remove Programs)
- Locate ScrewDrivers v6 or Simplify Printing v6 in the installed programs list
- Click Uninstall and follow the prompts
- Reboot the system after uninstallation completes
While not always required, rebooting after uninstalling v6 ensures all services and drivers are fully removed before installing v7.
Step 2: Run ScrewDrivers v7 Essentials Installer
Launch the ScrewDrivers Essentials installer (typically named ScrewDriversEssentials.exe or similar).
Step 3: Select Components
The installer presents two component options:
Endpoint (for printing)
- Enables printer redirection and management
- Required for print functionality
- Check this if you need printing capabilities
Scanning (for scanners)
- Enables scanner redirection
- Optional component
- Uncheck if you don't use scanner functionality
You can disable components you don't need. For example, if your organization doesn't use scanner redirection, uncheck "Scanning" to avoid installing unnecessary software.
Step 4: Configure Licensing
The installer prompts for licensing information:
Choose your licensing method:
License Server:
- Enter the hostname or IP address of your Tricerat License Server
- Format:
licenseserver.company.comor192.168.1.100 - Verify the License Server is accessible from this machine
Nodelock Key:
- Enter your v7 nodelock license key
- Nodelock licenses are tied to specific machines
- Useful for standalone or small deployments
Step 5: Complete Installation
Allow the installer to complete. This typically takes 5-10 minutes depending on system performance.
Step 6: Configure ScrewDrivers Endpoint
After installation completes, configure the v7 software with the settings you documented in the pre-upgrade phase.
Open ScrewDrivers Endpoint:
- Open the Start Menu
- Navigate to ScrewDrivers or Tricerat folder
- Launch ScrewDrivers Endpoint
In v6, the configuration was in Control Panel. In v7, the ScrewDrivers Endpoint configuration is accessed via the Start Menu as a standalone application.
Configuration Steps:
-
Review General Settings:
- Printer naming convention
- Printer creation method
- Auto-connect options
-
Apply Documented Settings:
- Replicate the printer naming you documented from v6
- Set printer creation preferences to match your previous configuration
- Configure any custom options
-
Save Configuration:
- Click Apply in the top right corner of the ScrewDrivers Endpoint window
- Settings are saved immediately
Step 7: Test Functionality
Before declaring the server upgrade complete:
- Log in as a test user on this App Server
- Verify printers appear in the user's session
- Test printing a document to ensure full functionality
- Check any scanner functionality if applicable
Step 8: Repeat for Additional Servers
Follow Steps 1-7 for each App Server or VDI host in your environment.
For Multi-Server Environments:
- Upgrade servers one at a time or in small groups
- Test functionality after each upgrade
- Keep at least one v6 server available during testing (if possible)
- Gradually migrate user sessions to upgraded servers
Upgrading Pro/Enterprise Editions
If you're upgrading to ScrewDrivers Pro or Enterprise editions (with SQL database, Administration console, and Print Server components), follow these steps in addition to or instead of the Essentials steps above.
Pro/Enterprise Upgrade Sequence
The typical upgrade sequence for Pro/Enterprise deployments:
1. Uninstall old license server (if using Concurrent Server or Concurrent User licensing)
If you're using Node Locked Server (NLS) licensing, skip steps 1 and 2 entirely—the license server steps only apply to Concurrent Server (CCS) or Concurrent User (CCU) licensing models.
For CCS/CCU licensing:
- Uninstall the existing v6 Tricerat License Server
- The v6 license server cannot serve v7 licenses, requiring upgrade
2. Install new license server (CCS/CCU licensing only)
Install the Tricerat License Server v5.6.4 or newer:
- Download
TriceratLicenseServer_5.6.4.0_x64.exefrom Tricerat Box.com Downloads - The new license server can serve both v6 and v7 licenses simultaneously
- This allows gradual migration—some servers running v6, others running v7
Activate your v7 licenses on the new License Server before proceeding with component upgrades.
3. Uninstall old ScrewDrivers Server software
Uninstall v6 server components from:
- Session hosts (RDS/VDI servers where users connect)
- Print servers (if using print server printing architecture)
- Management console workstations
Document current configuration before uninstalling to replicate settings in v7.
4. Install new ScrewDrivers Essentials or Pro/Enterprise v7 software on servers
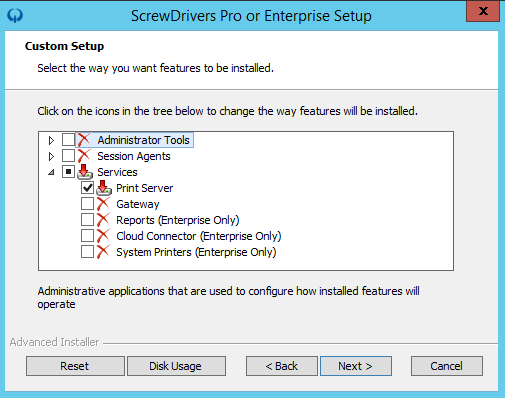
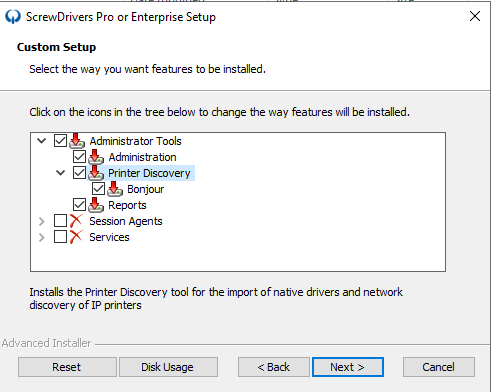
Run the appropriate v7 installer:
ScrewDriversProOrEnterprise_7.9.4.xxxxx_x64.exefor Pro/Enterprise editionsScrewDriversEssentials_7.9.4.xxxxx_x64.msifor Essentials edition
During installation, select only the components you'll be using:
- Print and Scan: Select if using printer AND scanner redirection
- Print only: Uncheck "Scanning" if only using print functionality
- Scan only: Uncheck "Print" if only using scanner redirection (rare)
Component Selection Note: Installing unnecessary components uses resources and may create confusion during troubleshooting. Only select what your environment actively uses.
5. Configure Auto Client Update Settings
In ScrewDrivers v7, the "Auto Client Update" feature is ON by default. This feature automatically upgrades v6 clients to v7 when they connect to a v7 server. For most organizations, you should TURN THIS OFF to prevent unintended automatic client upgrades.
Why turn off Auto Client Update?
v6 → v7 client upgrades require uninstall and reinstall—they cannot happen automatically. If Auto Client Update is enabled:
- v6 clients connecting to v7 servers will attempt to auto-update
- The auto-update will fail because v6 clients must be manually uninstalled first
- Users will experience connection issues or printing failures
How to disable Auto Client Update:
- Open the ScrewDrivers Administration Console (Pro/Enterprise) or ScrewDrivers Endpoint configuration (Essentials)
- Navigate to the Advanced tab or Settings section
- Locate the Auto Client Update option
- Uncheck or Disable the Auto Client Update option
- Click Apply to save the setting
When to enable Auto Client Update:
After all clients have been upgraded to v7, you can re-enable Auto Client Update. From that point forward, the feature works as designed—v7 clients will automatically receive updates to newer v7 builds (7.9.4 → 7.9.5, etc.) without manual intervention.
Related Documentation:
- How Does Enable Automatic Client Updates Work - Detailed explanation of Auto Client Update functionality
6. Upgrade clients to v7 (detailed steps in next section)
v7 servers are backwards compatible with v6 clients. This means:
- You can upgrade servers to v7 first
- V6 clients will continue working with v7 servers
- Client upgrades can happen gradually over time
This backwards compatibility allows phased rollouts and reduces upgrade risk.
Monitoring Client Versions
During the upgrade process, you'll want to monitor which clients are connecting with which versions to ensure successful migration.
ScrewDrivers Client Monitoring: Pro and Enterprise editions include built-in client version monitoring. See ScrewDrivers Client Monitoring for instructions on:
- Viewing connected client versions from the Administration Console
- Identifying which users are still on v6 clients
- Validating that v6 clients are at v6.10.3 (the last/most recent v6 client version)
Version Validation Tip: Before beginning v7 server upgrades, verify your v6 clients are at v6.10.3. Older v6 clients may have compatibility issues with v7 servers. If users are running older v6 client versions, upgrade them to v6.10.3 before starting the v7 server migration.
Pro/Enterprise Software Downloads
Latest version (as of this guide): v7.9.4
Download from Tricerat Box.com Downloads:
Core Components:
ScrewDriversProOrEnterprise_7.9.4.xxxxx_x64.exe- Server-side installer for Pro/EnterpriseScrewDriversEssentials_7.9.4.xxxxx_x64.msi- Server-side installer for EssentialsScrewDriversClient_7.9.4.xxxxx_x64.msi- Client-side installerScrewDriversDatabase_7.9.4.xxxxx_x64.exe- Database creation tool (Pro/Enterprise only)TriceratLicenseServer_5.6.4.0_x64.exe- License server (skip if using Node Locked licensing)
Release Notes: Version 7.9.4 Release Notes
Previous versions: See Release Notes Index for complete version history
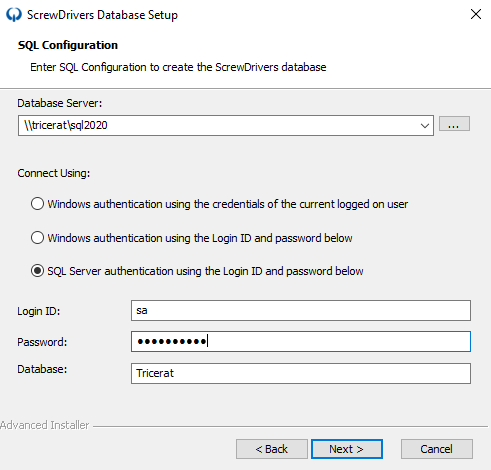
SQL Database Considerations
Pro and Enterprise editions require Microsoft SQL Server (SQL Server Express, Standard, or Enterprise).
Database Upgrade: The v7 database installer automatically upgrades existing v6 databases to v7 schema. Your printer assignments, configurations, and historical data migrate automatically.
SQL Server Setup Documentation:
- SQL Server Information for ScrewDrivers
- SQL Express Installation and Configuration
- SQL Permissions for ScrewDrivers
Upgrading End-User Clients
After App Servers/VDI hosts are upgraded to v7, migrate client workstations from v6 to v7 clients.
v6 Client Compatibility
v6 clients will work with v7 servers temporarily, allowing you to upgrade servers first and then roll out client updates gradually. However, you should upgrade clients as soon as practical to ensure full functionality and support.
Client Upgrade Process
The v6 client must be uninstalled before installing the v7 client. There is no in-place upgrade path.
Manual Client Upgrade
For small environments or individual workstations:
- Document client settings (if any custom configuration exists)
- Uninstall v6 client via Programs and Features
- Reboot the workstation (recommended)
- Install v7 client using the ScrewDrivers v7 client installer
- Verify functionality by connecting to a session and checking printer access
Automated Client Upgrade
For large environments with many workstations, use automated deployment methods.
Option 1: Push Uninstall and Install
Use your software deployment system (SCCM, Intune, PDQ Deploy, etc.) to:
- Push uninstaller to remove v6 clients
- Execute batch file to clean up remaining files/registry
- Push v7 installer with silent installation switches
- Verify success through deployment reporting
Option 2: Script-Based Deployment
Tricerat provides tools and scripts for bulk client upgrades:
Client Uninstall Tool: Download from: https://tricerat.box.com/s/f49vb698l8rz2mcwtko7bnlle5ytdjzx
This tool removes the v6 client and can be deployed via:
- Group Policy startup/shutdown scripts
- Configuration management systems
- Remote execution tools (PsExec, etc.)
Client Install Scripts (Silent Installation):
The v7 client supports silent installation with command-line switches for:
- License Server configuration
- Nodelock key installation
- Component selection
- Custom settings
Example Silent Install:
ScrewDriversClient_7.9.4.xxxxx_x64.msi /quiet LICENSESERVER=licenseserver.company.com
Silent Installation Documentation:
- Silent Install Switches v7.3.1 or newer - Complete documentation for v7 silent installation parameters and examples
- Silent Install Switches v7.0 or newer - Alternative documentation for earlier v7 versions
Client Communication Tools:
For organizations needing to communicate client version deprecation to end users:
- Inform End Users of ScrewDrivers Client Versions to be Deprecated - Instructions for configuring client deprecation alerts and notifications
This feature allows IT teams to display notifications to users running older client versions, prompting them to upgrade before support ends.
Client Deployment Best Practices
Phased Rollout:
- Pilot group: Deploy to a small test group first (IT department, willing volunteers)
- Monitor: Check for issues, gather feedback
- Department rollout: Deploy by department or location
- Full deployment: Complete the rollout once testing is successful
Communication:
- Notify users before upgrading their clients
- Provide instructions for any configuration they need to verify
- Inform users that they may need to restart their computers
- Offer help desk support during the migration
Troubleshooting:
- Enable logging on pilot clients to catch issues early
- Document and resolve common issues before broad deployment
- Keep v6 client installer available for rollback if critical issues arise
Post-Upgrade Tasks
Verify Functionality
After completing the upgrade:
- Test printing from all App Servers/VDI hosts
- Verify scanner functionality (if applicable)
- Check printer creation across different user scenarios
- Test profile application (if using printer profiles)
- Confirm licensing is working correctly (no license checkout failures)
Monitor Performance
Watch for issues in the first few days:
- Print job completion - Verify jobs successfully reach printers
- Printer creation time - Note if printers appear quickly in sessions
- User complaints - Track any issues reported by users
- Log files - Review ScrewDrivers logs for errors or warnings
Update Documentation
Document your v7 configuration for future reference:
- Configuration settings used
- Any issues encountered and resolutions
- Deployment scripts or tools used for client rollout
- License Server and key information
Remove v6 Software
Once v7 is stable and all clients are migrated:
- Remove v6 installers from deployment shares
- Archive v6 documentation for historical reference
- Deactivate v6 licenses on the License Server (if applicable)
- Clean up any remaining v6 registry keys or files (optional)
Rollback Plan
If you encounter critical issues during the upgrade:
Server Rollback
- Uninstall v7 software from the affected server
- Reboot the server
- Reinstall v6 from your archived installers
- Restore configuration from your documented settings
- Test functionality before returning server to production
Client Rollback
- Uninstall v7 client from affected workstations
- Reinstall v6 client using archived installer
- Verify functionality with v6 servers
Keep v6 installers and documentation available until you've fully validated the v7 upgrade and confirmed stability.
Troubleshooting Common Upgrade Issues
Printers Don't Appear After Upgrade
Possible Causes:
- License not activated or license checkout failing
- Configuration not applied correctly
- Endpoint service not running
Solutions:
- Verify licensing in ScrewDrivers Endpoint (check license status)
- Review and reapply configuration settings
- Restart ScrewDrivers services
- Enable logging and check for errors
Performance Issues After Upgrade
Possible Causes:
- .NET 4.8 not installed
- Insufficient system resources
- Network connectivity to License Server
Solutions:
- Verify .NET 4.8 installation
- Check system resources (CPU, RAM, disk)
- Test network connectivity to License Server
- Review Windows Event Logs for errors
Client Connection Issues
Possible Causes:
- Citrix or RDP plugin not registered after v7 client install
- Client services not running
- Firewall blocking communication
Solutions:
- Re-register client plugins (see Citrix Client Issues)
- Verify client services are running
- Check firewall rules for required ports
- Enable client-side logging and review logs
Getting Help
If you encounter issues during the upgrade:
Tricerat Support:
- Email: Support@tricerat.com
- Phone: 800-582-5167 x3
- Portal: https://support.tricerat.com
When Contacting Support, Provide:
- ScrewDrivers version (both v6 and v7 build numbers)
- Operating system versions (App Servers and clients)
- Deployment method (RDP, Citrix, VMware, etc.)
- Specific error messages or symptoms
- Log files with logging enabled
Related Documentation
- Upgrading to ScrewDrivers v7 Pro/Enterprise (See general upgrade documentation)
- Silent Install Switches for v7
- Version 7 Release Notes
- System Requirements
- Troubleshooting License Issues
- Citrix Client Issues